# Qorvex - "Concrete Mixer" | Config B | Armor/Shield Strip Ability (Patch 35.0)
| PATCH VERSION | [35.0](https://forums.warframe.com/topic/1374376-update-35-whispers-in-the-walls/) |
| MASTERY REQUIRED | 0 |
| FORMA REQUIRED | 4 |
| ENDO REQUIRED | 117,390 |
[](https://wikipedia.mutschlerhome.com/uploads/images/gallery/2023-12/jIL8nljRUzLrP6gu-image.png)
[](https://wikipedia.mutschlerhome.com/uploads/images/gallery/2023-12/OPJ03nAQt4MHKgje-image.png)
# Qorvex "Concrete Mixer" | Config B | Armor/Shield Strip Ability
Hello there,
# Introduction:
Concrete guy, Warframe literally made out of concrete. This **golem** is protecting its **Crucible Reactor Core**. He use it as his tool to annihilate any incoming threat. He is a heavy unit, may be a bit slow, but definitely a hard hitting one.
# Playstyle:
- always keep your **Disometric Guard** active
- **strip** enemies **armor** by using **Pillage**, it also **cleans any negative Status Effects**, combined with his **Disometric Guard** and **Shield Gating** makes him **very hard to kill**
- prime your enemies, and/or use your **Chyrinka Pillars** to spread **Radiation Status Effect**
- release your **Crucible Core**, and wipe out your enemies
- repeat until you done
# Attributes & Abilities:
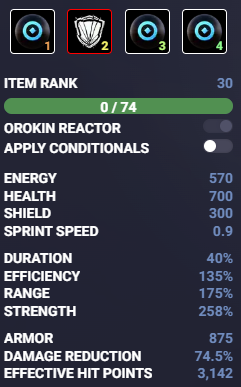
This time I'll start with the least needed stat, **Duration**. The only ability that use it is his first ability, **Chyrinka Pillars**. **Base duration** of that skill is **35s**! You don't need that, this is Warframe, you are not staying in one place for that long. So let me cut that stat in half, no... even more. Now **14s is acceptable**.
Next is **Efficiency**... this one is kind of important, because you are going to use your abilities a lot. You will also need a high amount of **Energy Pool** and some kind of **Energy Regeneration**.
**Range** is very needed, because of your **pillars working area** and **chain explosions** from enemies touched by **Crucible Blast**. It also affect a little bit on **Pillage**.
**You need minimum of 328% Strength**. Obviously to hit hard, duh. In this configuration it's **important** to put at least one regular **Crimson Archon Shard** for **Ability Strength**, to get **328%**, with this you will **strip armor** with just **one Pillage cast**. Alternatively you can use other armor strip ability.
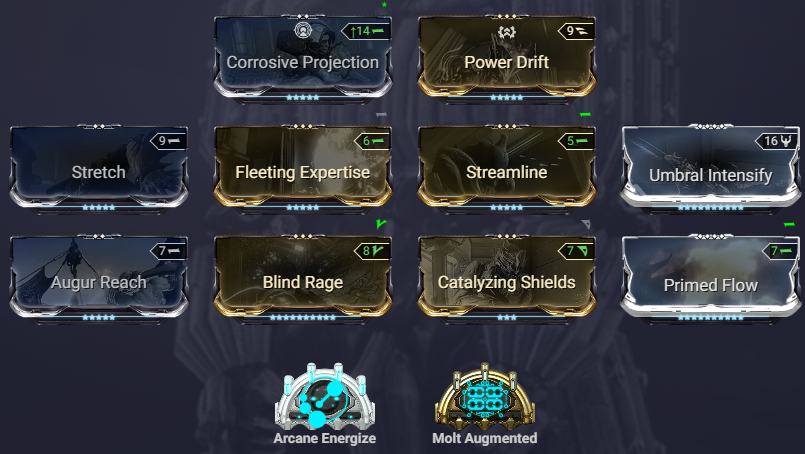
# Suggested Aura Mod:
For best results use [**Aura Forma**](https://warframe.fandom.com/wiki/Aura_Forma), so that it can be changed, when needed.
- [***Corrosive Projection***](https://warframe.fandom.com/wiki/Corrosive_Projection) - Reduces enemy armor.
- [***Shield Disruption***](https://warframe.fandom.com/wiki/Shield_Disruption) - Reduces enemy shields.
# Suggested Exilus Mod:
Must be unlocked with an [**Exilus Adapter**](https://warframe.fandom.com/wiki/Exilus_Warframe_Adapter).
- [***Power Drift***](https://warframe.fandom.com/wiki/Power_Drift) - Increases Ability Strength and grants a chance to resist knockdown.
# Suggested Warframe Arcane Enhancements (Max Rank Description):
- [***Arcane Aegis***](https://warframe.fandom.com/wiki/Arcane_Aegis) - On Shield Damaged, 3% chance for +30% Shield Recharge for 12s.
- [***Arcane Avenger***](https://warframe.fandom.com/wiki/Arcane_Avenger) - On Damaged, 21% chance for +45% Critical Chance for 12s.
- [***Arcane Barrier***](https://warframe.fandom.com/wiki/Arcane_Barrier) - On Shield Damaged, 6% chance to instantly restore all Shields, 6s cooldown.
- [***Arcane Blessing***](https://warframe.fandom.com/wiki/Arcane_Blessing) - On Health Pickup, +24 Max Health. Stacks up to 50x.
- [***Arcane Energize***](https://warframe.fandom.com/wiki/Arcane_Energize) - On Energy Pickup, 60% chance to replenish 150 Energy to self and allies within 15m. 15s cooldown.
- [***Arcane Eruption***](https://warframe.fandom.com/wiki/Arcane_Eruption) - On Energy Pickup, 100% chance to Knockdown nearby enemies.
- [***Arcane Guardian***](https://warframe.fandom.com/wiki/Arcane_Guardian) - On Damaged, 15% chance for +900 Armor for 20s.
- [***Arcane Pulse***](https://warframe.fandom.com/wiki/Arcane_Pulse) - On Health Pickup, 60% chance to restore 300 Health to allies within 25m. 15s cooldown.
- [***Arcane Reaper***](https://warframe.fandom.com/wiki/Arcane_Reaper) - On Melee Kill, +24 Heal Rate/s and +660 Armor for 10 seconds.
- [***Arcane Steadfast***](https://warframe.fandom.com/wiki/Arcane_Steadfast) - On Ability Cast, 20% chance that the next 3 Abilities will not cost Energy.
- [***Arcane Tanker***](https://warframe.fandom.com/wiki/Arcane_Tanker) - On Archgun Equipped, +1200 Armor for 60s.
- [***Arcane Ultimatum***](https://warframe.fandom.com/wiki/Arcane_Ultimatum) - On Finisher Kill, +1200 Armor for 45s.
- [***Molt Augmented***](https://warframe.fandom.com/wiki/Molt_Augmented) - On Kill, +0.24% Ability Strength. Stacks up to 250x. **<- in this configuration this one is a must!**
# Suggested Archon Shards (Tauforged):
- [***Crimson Archon Shards***](https://warframe.fandom.com/wiki/Archon_Amar) (RED):
+10% (+15%) Ability Strength **<- in this configuration one regular is a must!**
- [***Amber Archon Shards***](https://warframe.fandom.com/wiki/Archon_Nira) (YELLOW):
+25% (+37.5%) Casting Speed
+15% (+22.5%) Parkour Velocity
- [***Azure Archon Shards***](https://warframe.fandom.com/wiki/Archon_Boreal) (BLUE):
+50 (+75) Energy Max
+150 (+225) Armor
+5 (+7.5) Health/s Regenerated
# Suggested Focus School:
- [***Madurai***](https://warframe.fandom.com/wiki/Focus/Madurai#Ways):
**Power Transfer** - 50% Casting Speed on switching to Warframe.
**Sling Strength** - Switching to Warframe after a Chained Sling adds 40% Ability Strength for 20s.
- [***Vazarin***](https://warframe.fandom.com/wiki/Focus/Vazarin#Ways):
**Void Snare** - Ability launches a projectile that spins up a vortex trap on impact, or tap 2 again to detonate in-flight. Trap lasts 8s.
**Protective Sling** - Allies touched by Void Sling are granted immunity from damage for 5s and healed 60% over 5s for 10 energy cost.
- [***Naramon***](https://warframe.fandom.com/wiki/Focus/Naramon#Ways):
**Power Spike** - Melee Combo Counter now decays while out of combat by 5 every few seconds, instead of depleting completely.
- [***Unairu***](https://warframe.fandom.com/wiki/Focus/Unairu#Ways):
**Poise** - Gain immunity to slow, stagger, and knockdown effects for 40s after transferring between Operator or Warframe.
**Magnetic Flare** - Use your first Ability to create a 8m radius field that lasts for 30s and disables the shields of any enemy that enters it.
**Caustic Strike** - Second Ability launches an energy bomb that explodes with a 8m radius, stripping 100% of enemy armor. Tap 2 again to detonate in-flight.
- [***Zenurik***](https://warframe.fandom.com/wiki/Focus/Zenurik#Ways):
**Energy Pulse** - Energy pickups grant 50 % additional energy over 5s.
**Wellspring** - First Ability creates a well of energy for 8s. Allies passing through the well gain 5 Energy/s for 30s. Use your first Ability inside a Wellspring to increase its size, boost its duration by 20s, and grant 20% Ability Strength to those inside.
**Temporal Drag** - Second Ability emits a radial burst, slowing any enemy it touches by 80% for 10s.
# Suggested Helminth Subsumable Abilities:
- [***Shuriken***](https://warframe.fandom.com/wiki/Shuriken) - Damage, Slash Status on Hit, with augment [**Seeking Shuriken**](https://warframe.fandom.com/wiki/Seeking_Shuriken), Armor Strip.
- [***Fire Blast***](https://warframe.fandom.com/wiki/Fire_Blast) - Crowd Control, Armor Strip, with augment [**Healing Flame**](https://warframe.fandom.com/wiki/Healing_Flame), Healing, with augment [**Purifying Flames**](https://warframe.fandom.com/wiki/Purifying_Flames), Status Immunity.
- [***Pillage***](https://warframe.fandom.com/wiki/Pillage) - Defense Strip, Shield Restore, Status Cleanse.
- [***Terrify***](https://warframe.fandom.com/wiki/Terrify) - with augment [**Creeping Terrify**](https://warframe.fandom.com/wiki/Creeping_Terrify), Armor Strip, Crowd Control.
- [***Tharros Strike***](https://warframe.fandom.com/wiki/Tharros_Strike) - Crowd Control, Defense Strip, Healing.
# Suggested Loadout:
- [***Weapons***](https://warframe.fandom.com/wiki/Weapons) - [**Primary**](https://warframe.fandom.com/wiki/Weapon_Comparison/Primary), [**Secondary**](https://warframe.fandom.com/wiki/Weapon_Comparison/Secondary), [**Melee**](https://warframe.fandom.com/wiki/Weapon_Comparison/Melee), [**Parazon**](https://warframe.fandom.com/wiki/Parazon#References)? [**Archgun**](https://warframe.fandom.com/wiki/Weapon_Comparison/Arch-Gun#Atmosphere_)?
- [***Amp***](https://warframe.fandom.com/wiki/Amp) - chosen [**Amp Parts**](https://warframe.fandom.com/wiki/Amp#List_of_Components) and [**Arcanes**](https://warframe.fandom.com/wiki/Arcane_Enhancement#Amp_Arcanes).
- [***Operator***](https://warframe.fandom.com/wiki/Operator) - chosen [**Arcanes**](https://warframe.fandom.com/wiki/Arcane_Enhancement#Operator_Arcanes).
- [***Companion***](https://warframe.fandom.com/wiki/Companion) - [**Sentinel**](https://warframe.fandom.com/wiki/Sentinel), [**MOA**](https://warframe.fandom.com/wiki/MOA_(Companion)), [**Hound**](https://warframe.fandom.com/wiki/Hound_(Companion)), [**Kubrow**](https://warframe.fandom.com/wiki/Kubrow), [**Kavat**](https://warframe.fandom.com/wiki/Kavat), [**Predasite**](https://warframe.fandom.com/wiki/Predasite), [**Vulpaphyla**](https://warframe.fandom.com/wiki/Vulpaphyla).
# Summary:
Quorvex is definitely a solid Warframe (pun intended), but personally, it didn't make much of an impression on me, probably due to its specific layer of concrete :D
# Shared with:
[**Nuclear Concrete | Config A**](https://overframe.gg/build/568996) - [MutschlerHome Link](https://wikipedia.mutschlerhome.com/books/warframe/page/qorvex-nuclear-concrete-config-a-grouping-ability-patch-350)
[**Concrete Mixer | Config B**](https://overframe.gg/build/569210) - [MutschlerHome Link](https://wikipedia.mutschlerhome.com/books/warframe/page/qorvex-concrete-mixer-config-b-armorshield-strip-ability-patch-350)
[**A Breach in the Wall | Config C**](https://overframe.gg/build/569516) - [MutschlerHome Link](https://wikipedia.mutschlerhome.com/books/warframe/page/qorvex-a-breach-in-the-wall-config-c-damage-multiplierdamage-vulnerability-debuff-ability-patch-350)
Enjoy!
[**THeMooN85**](https://overframe.gg/user/191/themoon85)